This is an old revision of the document!
Table of Contents
Introduction
Files!
You can get the schematic and layout files over at GitHub, they're licensed CC attrib/sharealike
Installing FTDI drivers
Step #1 is to plug in your FTDI adapter and install the driver (in case it isnt on there already). If you have an FTDI cable proper, there is already a USB A connector on the end. If you have an FTDI adapter, you'll need a standard mini-B cable, pretty much everything uses these so steal your camera's or cell phone's data cable
If you are using Windows or Mac OS, you may need to need to download the FTDI driver if you haven't already installed it for another project. If you are using Linux, the driver is already built in to the operating system (handy!)
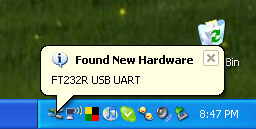
Next up, plug it into your computer! If you are using Windows you may hear a sound from the computer and a little popup bubble in the bottom right corner of the screen that says Found New Hardware FT232R USB UART

After a few seconds, the new hardware wizard will start. Select "No not this time" and click Next>

At the next screen, select Install from a list or specific location

At the next screen make sure Include this location is selected and browse to the folder that contains the driver you downloaded. Select the folder and click OK

It should copy some files and then come up with this window. Click Finish

Almost immediately, another window will pop up, this time it will say USB Serial Port. As before, click Install from a list or specific location

Browse to the same folder again…

And it should complete successfully!

You may need to reboot the computer.

COM / Serial port name
OK now we will verify that the driver installed properly.
Under Mac, in the Terminal window, type in ls /dev/cu.* which should give the following responses or so

The name we are looking for is /dev/cu.usbserial-XXXX where the X's are going to be unique for each cable. Copy and paste the name into a text file so you'll remember it for later.
For Linux/Unix type ls /dev/ttyUSB* into a terminal window, you should see a device file called something like ttyUSB0

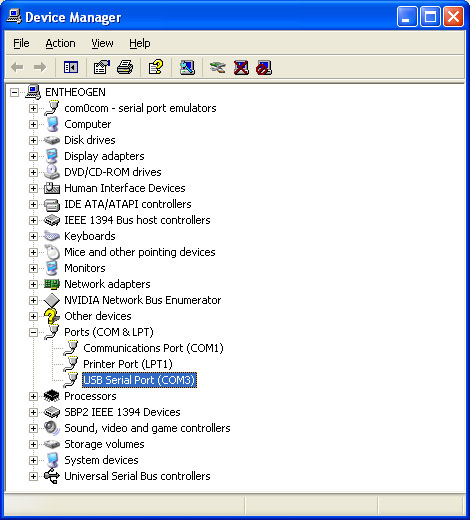
If you are using Windows, go to the Device Manager (From the Start Menu, select Settings→Control Panel. Double click on System and select the Hardware tab. Then click on the Device Manager button)

Look for an entry under Ports (COM & LPT) that says USB Serial Port (COM) the COM number may vary but it should be something like COM3 or COM4 the COM number may be as high as COM99 so just look for the USB serial port. The COM stands for "communication", and each one has a unique number, known as the COM Port number. In this case the COM Port number is COM3. If you don't see the COM port verify the cable is plugged in, and check that you installed the VCP FTDI driver.
Then right click and select Properties

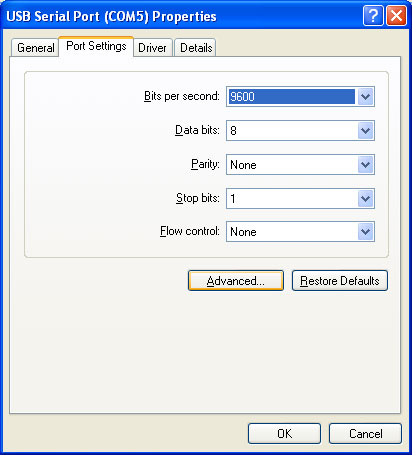
Click on the Port Settings tab, and click on Advanced…

Make sure Set RTS On Close used to be required for people using the Arduino IDE before like version 18 or so. Now you dont need it so make sure its not selected!
Whats the difference between an FTDI cable/adapter & AVR programmer?
There are two ways to program an AVR microcontroller. One is to reprogram the entire chip using an AVR programmer. The other is to use a bootloader that is pre-programmed onto the chip that allows the chip to re-program itself. An AVR programmer is more powerful: you can really mess with anything on the chip and the entire 32K of memory is available. Using the bootloader is safer: there's no way to mess with the fuse settings (which could brick the chip) but you only get 30K of memory since 2K is used by the bootloader. Not a big deal, but if you are working on a big project which requires tons of flash space, you may need it
Note that to program an AVR you need an AVR programmer (like a USBtinyISP), but to upload using the bootloader you need a computer-serial connection (such as an FTDI cable). Unfortunately, they are not the same device! If you're not a microcontroller wiz, I suggest going with the bootloader (FTDI) method. Its as fast (or faster), allows you to debug as well, and theres virtually no way to damage/brick the chip by messing with the fuses. If you're familiar with microcontroller programming, and you have a programmer, then feel free to go that direction.
SO!
- AVR programmers are more powerful in that you can program any AVR, even blank ones from the factory. But that also means you have a pretty good chance of 'bricking' the chip!
- FTDI adapters can send any serial data back and forth including updating AVRs with a bootloader on them. But you need to get that bootloader on there first, which basically requires an AVR programmer.
If you use an AVR programmer to write to chip with a bootloader on it, you'll overwrite the bootloader so just be aware of that!
Programming blank AVRs
So even though I said FTDI adapters are not for programming 'raw' AVRs, it turns out you can 'convince' the chip to do it with a bit of manipulation. One way that is documented so far doesnt require soldering but it does require updating the AVRDUDE software and installing a different driver. (see also this post and this link for using an FTDI adapter instead of an Arduino)
If you have an FTDI friend or other breakout where you can get to the DTR line, I found a way to do it that requires soldering a wire but no AVRDUDE/driver messing. The trade off is that it is really slow - good for maybe burning a bootloader on, not good for day-to-day AVR development
Turn over the FTDI friend, and solder a dot of solder onto the DTR pin on the bottom left.
Solder a wire onto it, making sure you dont short it to the gold square just to the right. We'll use a white wire
Plug in wires into the FTDI breakout, black is ground, blue is CTS, red is VCC, orange is TX and green is RTS
Now you have to make a text edit to your avrdude.conf.
If you've installed WinAVR or similar (say for Mac or Linux) , it'll be in something like C:\WinAVR\bin\avrdude.conf or C:\WinAVR\etc\avrdude.conf if you aren't sure where it is, but you have avrdude installed, you can run avrdude -c xyzwhich will dump the programmer list, if you look to the right, the name of the conf file will be printed

A common reason for wanting to program an AVR is to put the Arduino bootloader on there, in which case, you may not have WinAVR installed. Luckily, avrdude is there, its just 'hidden' in the IDE package (for Mac users,you need to actually "explore" the App) if you're running windows, go to the folder where you have the IDE installed and go into the hardware\tools\avr\etc folder to open up avrdude.conf
OK! Now that you have avrdude.conf open, find the string ponyser, then add the following bold text right before hand so the avrdude.conf looks like this:
# some ultra cheap programmers use bitbanging on the
# serialport.
#
# PC - DB9 - Pins for RS232:
#
# GND   5   -- |O
#              |   O| <-   9   RI
# DTR   4   <- |O   |
#              |   O| <-   8   CTS
# TXD   3   <- |O   |
#              |   O| ->   7   RTS
# RXD   2   -> |O   |
#              |   O| <-   6   DSR
# DCD   1   -> |O
#
# Using RXD is currently not supported.
# Using RI is not supported under Win32 but is supported under Posix.

# serial ponyprog design (dasa2 in uisp)
# reset=!txd sck=rts mosi=dtr miso=cts
programmer
  id    = "ftdifriend";
  desc  = "design ftdi adatper, reset=dtr sck=tx mosi=rts miso=cts";
  type  = serbb;
  reset = ~4;
  sck   = ~3;
  mosi  = ~7;
  miso  = ~8;
;
# serial ponyprog design (dasa2 in uisp)
# reset=!txd sck=rts mosi=dtr miso=cts

programmer
  id    = "ponyser";
  desc  = "design ponyprog serial, reset=!txd sck=rts mosi=dtr miso=cts";
  type  = serbb;
  reset = ~3;
  sck   = 7;
  mosi  = 4;
  miso  = 8;
;
Save the file.
If you just want to program the Arduino Bootloader on...
Don't forget, if you have two 'duinos, you can turn one into an ISP programmer, check out this tutorial which runs much faster than the below.
You can burn chips right from the Arduin IDE with one more edit, open up the programmers.txt file (its in hardware\arduino in the IDE installation) and add the following text to the bottom
ftdifriend.name=FTDI Friend bitbang
ftdifriend.communication=serial
ftdifriend.protocol=ftdifriend
Save programmers.txt
Its time to wire it up!
- Connect the Black (Ground) wire to the ground of your chip
- Connect the Red (VCC) wire to the power/VCC/5V pin of your chip
- Connect the White (DTR) wire to the Reset pin
- Connect the Orange (TX) wire to SCK pin (Arduino pin 13)
- Connect the Green (RTS) wire to MOSI pin (Arduino pin 12)
- Connect the Blue (CTS) wire to the MISO pin (Arduino pin 11)
Start up the IDE and select the COM port of the FTDI friend

Make sure you have the right Board selected, for whatever you want to burn. Then select Burn Bootloader→FTDI Friend

It will take a really really long time to program the chip, about two hours!
Its taking forever because its programming very inefficiently. It takes 4 bytes to program one byte of the AVR, and data is sent as a single bit in two USB packet, each packet takes 3 milliseconds and an AVR has 32768 bytes = 262144 bits. 262144 bits * 2 packet/bit * 3 ms/packet * 4 bytes/byte = 6291456 ms = 6300 seconds = 104 minutes! If you used a real AVR programmer, it would take maybe 15 seconds so thats why its nice to have one.
Do this before you go to bed or watch a movie! The L (pin 13) LED will be on 'solid' while its programming. When it goes out you're done. Its very slow but if you're in a pinch, it may come in handy!
Using the command line AVRdude
Now if you open up a terminal and try running avrdude -c ftdifriend If you are using the avrdude installation thats inside the Arduino IDE, you can open up a cmd terminal and cd to the directory where you have the IDE installed and then go to hardware\tools\avr. Then you can run bin\avrdude.exe -C etc\avrdude.conf -c ftdifriend so for example, my installation is in C:\arduino-0018\ I cd to C:\arduino-0018\hardware\tools\avr

You should get a note that No AVR part has been specified (not that it Can't find programmer id "ftdifriend")
Great, now its time to program!
- Connect the Black (Ground) wire to the ground of your chip
- Connect the Red (VCC) wire to the power/VCC/5V pin of your chip
- Connect the White (DTR) wire to the Reset pin
- Connect the Orange (TX) wire to SCK pin
- Connect the Green (RTS) wire to MOSI pin
- Connect the Blue (CTS) wire to the MISO pin We suggest verifying the wiring! We'll verify the connection by running avrdude -c ftdifriend -P \\.\COMxx -p atmega328p Replace the \\.\COMxx with the COM port you found in the earlier part of this tutorial via the Device Manager. If you're using linux or mac, the COM port should be /dev/cu.usbserialXXX or /dev/ttyUSBx to match the name. For the device, we're testing with an Atmega328p chip which is found in the latest Arduinos. If you're using some other chip, substitute the name right after the -p
If you are using the avrdude in the Arduino IDE, you'll need to use bin\avrdude -C etc\avrdude.conf -c ftdifriend -P \\.\COMxx -p atmega328p etc.

Once you have the hashbar show up nicely, that means you are talking to the chip all right. Yay! You can now program the chip using the -U flash:w: command.
Press the up arrow to get back the command you wrote and tack onto the end a -U flash:w:firmware.hex (where firmware.hex is the hex file you want to burn in) For example, if you want to burn a bootloader on, make it easy on yourself by copying the file from use:
bin\avrdude.exe -C etc\avrdude.conf -c ftdifriend -P \\.\COM46 -p atmega328p -U flash:w:..\..\arduino\bootloaders\atmega\ATmegaBOOT_168_atmega328.hex
(you can also copy your file to C:\ so its not so long to type. Hit return and grab a beer, it'll take about 5 minutes per byte of data you want to write&verify)


 OR
OR 


