*** Channel 1
Baudrate 9600, I/F Mode 4C, Flow 00
Port 10001
Connect Mode : D4
Send '+++' in Modem Mode enabled
Show IP addr after 'RING' enabled
Auto increment source port disabled
Remote IP Adr: --- none ---, Port 00000
Disconn Mode : 00
Flush Mode : 00
Make a note of the IP address, you'll need it later
Install NewSoftSerial library by uncompressing it and installing it according to our tutorial
#include <NewSoftSerial.h>

#define XPORT_RXPIN 2
#define XPORT_TXPIN 3
#define XPORT_RESETPIN 4
#define XPORT_DTRPIN 5
#define XPORT_CTSPIN 6
#define XPORT_RTSPIN 7

NewSoftSerial mySerial(XPORT_TXPIN, XPORT_RXPIN);

void setup()
{
  Serial.begin(9600);
  Serial.println("Goodnight moon!");

  // set the data rate for the NewSoftSerial port
  mySerial.begin(9600);
  mySerial.println("Hello, world?");
}

void loop()                     // run over and over again
{

  if (mySerial.available()) {
      Serial.print((char)mySerial.read());
  }
  if (Serial.available()) {
      mySerial.print((char)Serial.read());
  }
}
You will only need 2 pins for this example, the XPort RX pin goes to the Arduino's pin 3 and the TX pin goes to the Arduino's pin 2
This photo shows the RESET, CTS and DTR wires as well, but just leave those out

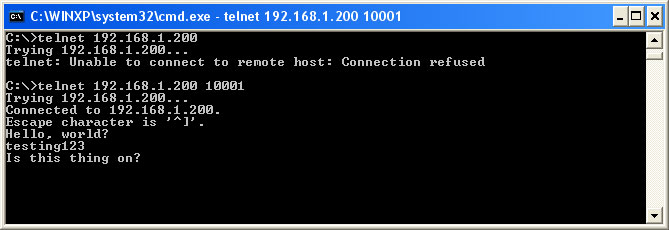
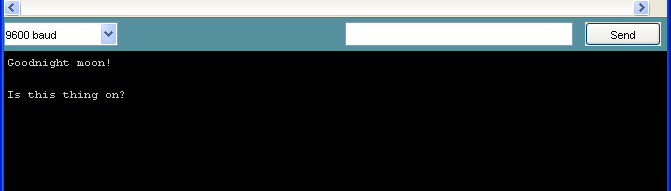
Telnet to port 10001 of the XPort, then start up the Serial Monitor. Reset the Arduino (it should auto-reset when the serial monitor starts). After the startup delay (if there is one) You should see "Goodnight moon!" in the Arduino Serial Monitor and "Hello world?" in the telnet window. You can then send from the Arduino to the XPort...
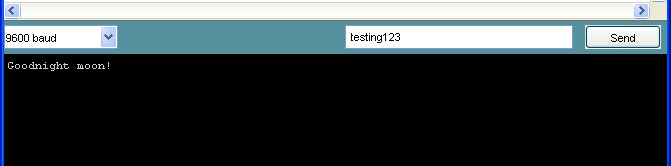
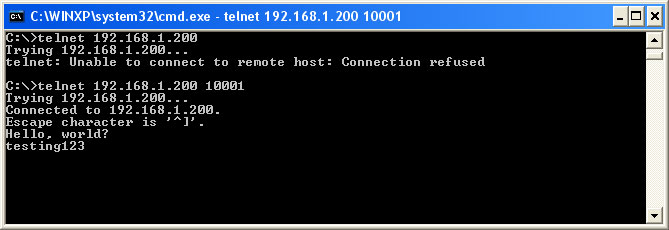
and vice versa...